Robot GUI (MARG): Difference between revisions
(→Camera) |
|||
| Line 35: | Line 35: | ||
====Camera==== | ====Camera==== | ||
Select the camera module and press the connect button (as shown on image) | Select the camera module (1) and press the connect button (2) (as shown on image). | ||
This should change the "camera" module button to green. | |||
Then type push cmd="imageget" in the field (3) | |||
push cmd="imageget" | |||
Press the send button (4). | |||
A list of data should appear, with one new line every second, something like: | |||
... <push done="true"></push> | |||
-> push cmd="imageget" | |||
<imageget x="0" y="0" w="0" h="0" format="BGR" remRad="false" dev="10" imgTod="1281613399.200692" posName="" pool="0"></imageget> | |||
<imageget x="0" y="0" w="0" h="0" format="BGR" remRad="false" dev="10" imgTod="1281613400.182666" posName="" pool="0"></imageget> | |||
<imageget x="0" y="0" w="0" h="0" format="BGR" remRad="false" dev="10" imgTod="1281613401.164516" posName="" pool="0"></imageget> | |||
<imageget x="0" y="0" w="0" h="0" format="BGR" remRad="false" dev="10" imgTod="1281613402.146366" posName="" pool="0"></imageget> | |||
<imageget x="0" y="0" w="0" h="0" format="BGR" ... | |||
The image will not be shown (not implemented). | |||
[[Image:marg-cam1.png]] | [[Image:marg-cam1.png]] | ||
Revision as of 12:09, 12 August 2010
MARG (Mobile Autonomous Robot GUI) is a java applet intended as a graphical user interface for Mobotware robots.
At present is is used for hardware test for SMR robots, as most of the graphical display and data capture is missing.
How to use
Start a web browser, and in the adress field type the name of the SMR, e.g.:
smr3
The java applet wil be loaded (if asked, accept to run this applet).
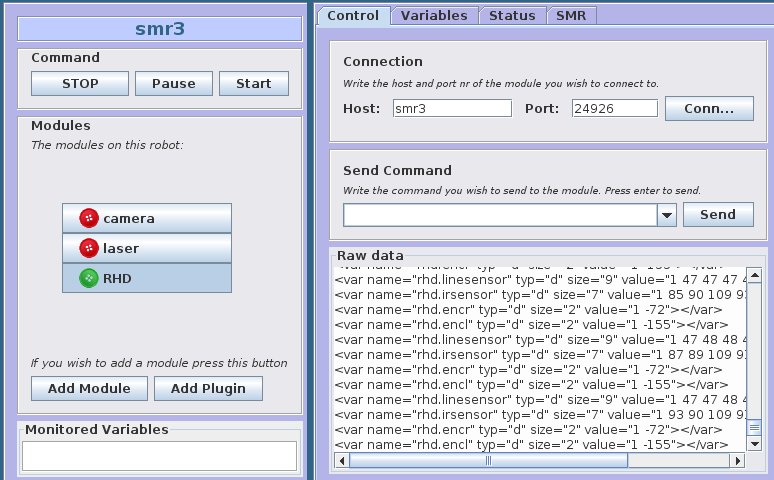
Start image when monitoring SMR3
TEST hardware
Three set of sensors can be tested:
* Linesensor, IR-sensor, and wheel control
* camera
* laserscanner
Linesensor, IR-sensor, wheel control
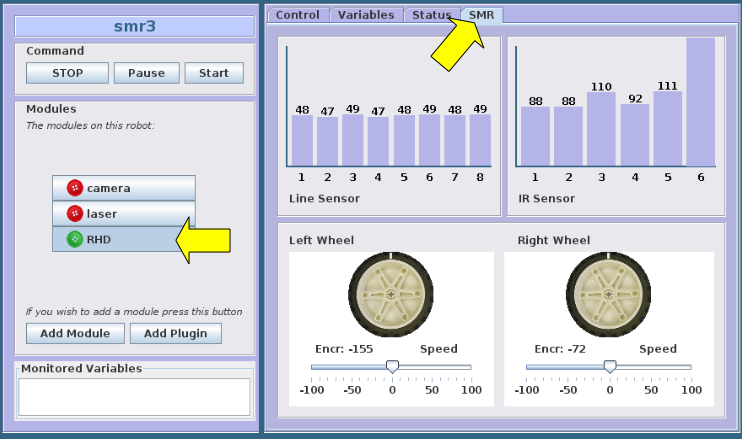
Select RHD module and SMR-tab:
The line-sensor and IR-sensor should now update (once every second).
The wheel control can be tested by moving the slider below the left and right wheel symbol.
Camera
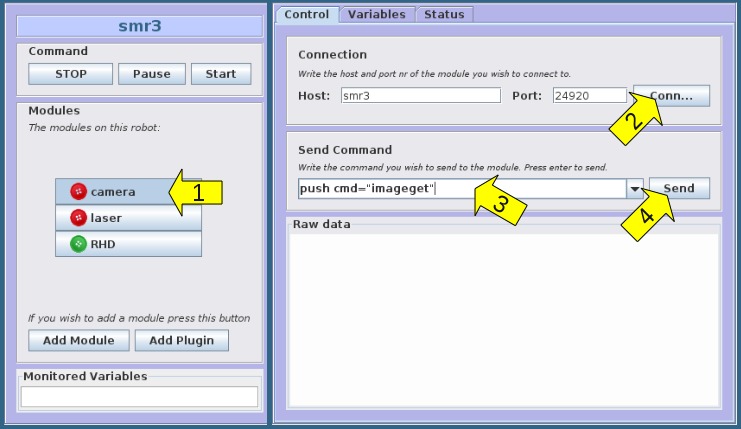
Select the camera module (1) and press the connect button (2) (as shown on image).
This should change the "camera" module button to green. Then type push cmd="imageget" in the field (3)
push cmd="imageget"
Press the send button (4).
A list of data should appear, with one new line every second, something like:
... <push done="true"></push>
-> push cmd="imageget"
<imageget x="0" y="0" w="0" h="0" format="BGR" remRad="false" dev="10" imgTod="1281613399.200692" posName="" pool="0"></imageget>
<imageget x="0" y="0" w="0" h="0" format="BGR" remRad="false" dev="10" imgTod="1281613400.182666" posName="" pool="0"></imageget>
<imageget x="0" y="0" w="0" h="0" format="BGR" remRad="false" dev="10" imgTod="1281613401.164516" posName="" pool="0"></imageget>
<imageget x="0" y="0" w="0" h="0" format="BGR" remRad="false" dev="10" imgTod="1281613402.146366" posName="" pool="0"></imageget>
<imageget x="0" y="0" w="0" h="0" format="BGR" ...
The image will not be shown (not implemented).


