24V switch: Difference between revisions
From Rsewiki
No edit summary |
(→RHD) |
||
| Line 23: | Line 23: | ||
== RHD == | == RHD == | ||
The RHD plugin is called 24v_switch and uses the following configuration in | The RHD plugin is called 24v_switch and uses the following configuration in rhdconfig.xml | ||
<!-- This switch has only one W-variable - called usb24vswitch - with values 0 or 1 --> | <!-- This switch has only one W-variable - called usb24vswitch - with values 0 or 1 --> | ||
| Line 32: | Line 32: | ||
debug="0"> | debug="0"> | ||
</switch24v> | </switch24v> | ||
This should create a write variable for the MRC | |||
usb24vswitch | |||
Latest revision as of 14:58, 25 March 2019
Switch - intended for a 24V motor with no more than 3-4A continuous current
The box has a microprocessor controllable with a simple set of commands.
power on
power off
power
help
"help" shows the list of commands, when using e.g. putty as a client.
"power" without parameter returns current setting as
"# power is 0\n" or
"# power is 1\n"
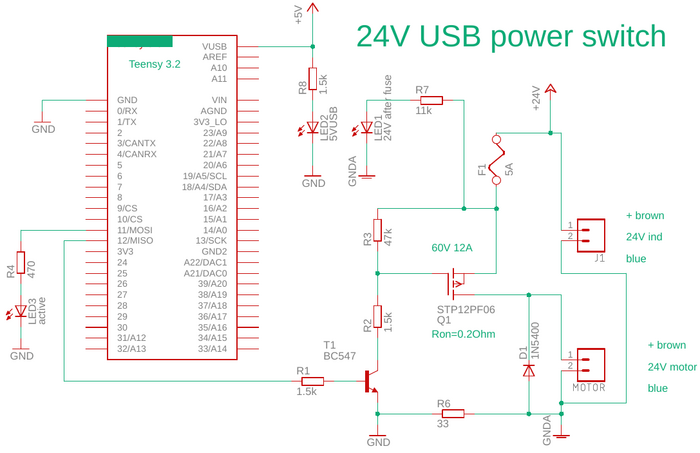
The schematic is as in figure 1.
Figure 1. Schematics for 24V switch. The teensy is a 3.2 (the pin layout is here for a teensy 3.5). The MOSFET is mounted on the PCB, but 1W (5A) should be OK. The fuse is an automotive-fuse, that could be replaced with 10A if close to 5A use.
RHD
The RHD plugin is called 24v_switch and uses the following configuration in rhdconfig.xml
   <switch24v enable="true"
           lib="24v_switch.so.1"
           critical="false"
           device="/dev/ttyACM0"
           debug="0">
   </switch24v>
This should create a write variable for the MRC
usb24vswitch
