SMR test
SMR test procedures
Currently two tests are implemented for the SMR's.
- A simple test checking that IR-sensors, linesensor and motorcontrollers are running and communicating with RHD and MRC.
- An advanced test that also includes guidemark's, and laser-based localisation.
Both tests are run by logging into the system as "test" and using the scripts found in the smr folder (/vhome/test/smr).
Simple Test
Place the SMR you want to test on teststand. Run the command from the smr folder.
test@localhost:~/test$ ./test smrX
Where smrX is the name of the SMR you are testing (fx. smr1).
Advanced Test
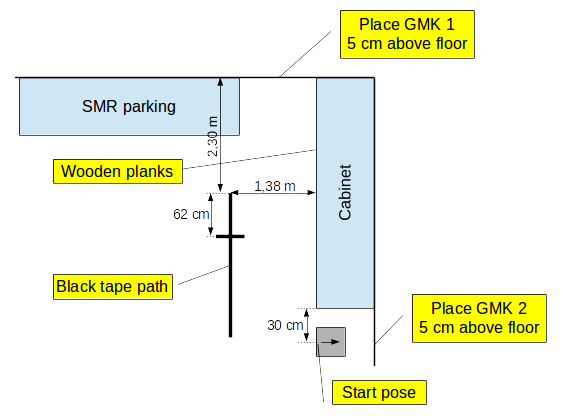
The advanced test uses a predefined course in the SMR-pit in the corner of room 027. The course is sketched below. It is necessary to put light-colored wooden planks along the base of the cabinet as the laser-scanner can't see the dark footing.

Place the SMR on the start spot. Run the following command.
test@localhost:~/test$ ./mobotwaretest smrX
The test system will open 3 windows containing ulmsserver, ucamserver and mrc. As the robot moves around the course it should say the guidemark numbers and should end up close to the starting point. When the robot is finished close down the servers properly by type in "q" to the server.