Robot GUI (MARG)
MARG (Mobile Autonomous Robot GUI) is a java applet intended as a graphical user interface for Mobotware robots, but all intended features are not implemented yet.
At present MARG is used for hardware test for SMR robots.
How to use
Start a web browser, and in the address field type the name of the SMR, e.g.:
smr3.iau.dtu.dk
The java applet wil be loaded (you may be asked to accept to run this applet).
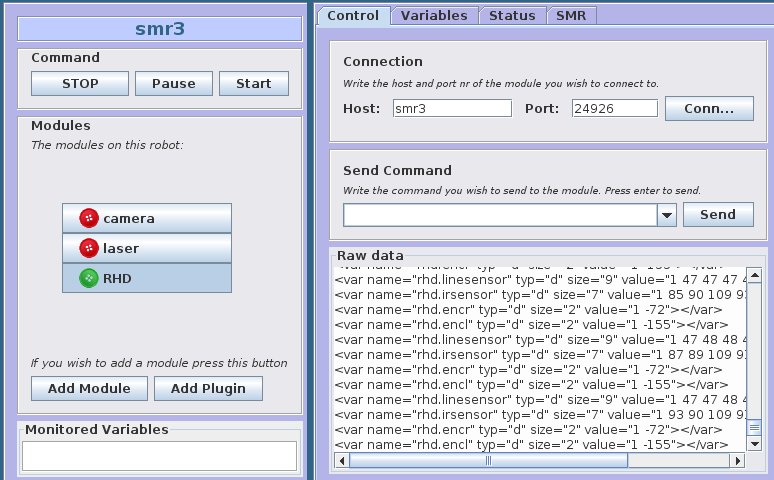
Figure 1: Start image when MARG is loaded (shown for smr3)
TEST hardware
Start the MARG as described above.
Three set of hardware can be tested:
- Linesensor, IR-sensor, and wheel control
- camera
- laserscanner
Linesensor, IR-sensor, wheel control
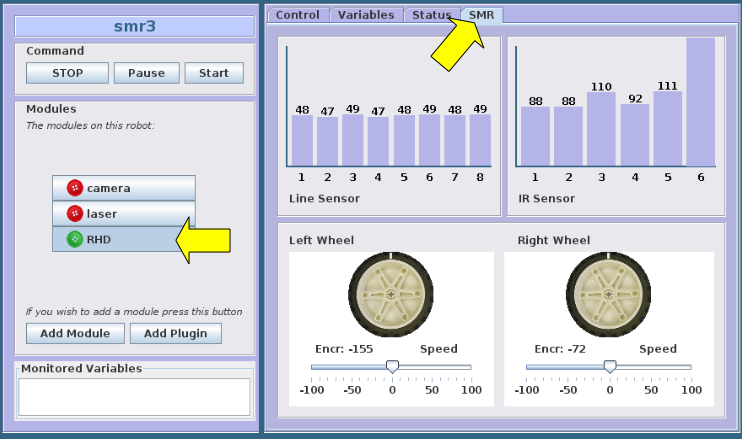
Select RHD module and SMR-tab:
The line-sensor and IR-sensor should now update (once every second).
The wheel control can be tested by moving the slider below the left and right wheel symbol.
Figure 2: Graphic monitoring of linesensor, IR-sensor and wheel control.
Further data can be evaluated on the Variables tab where there is a rhd-folder with all RHD data. Press Update to refresh the values.
Camera
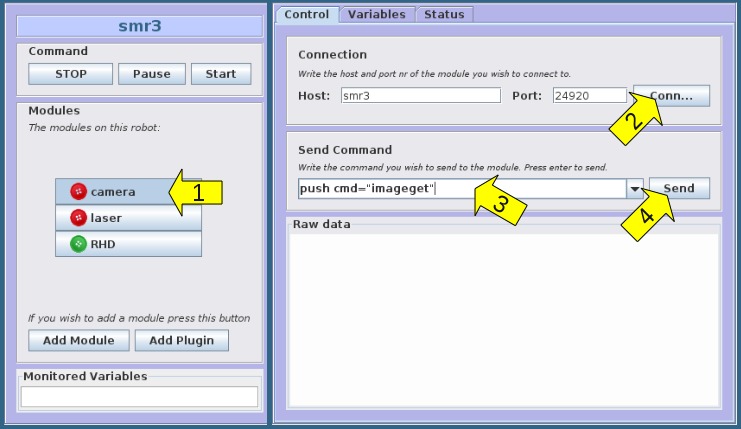
Select the camera module (1) and press the connect button (2) (as shown on image).
This should change the camera button to green. Then type push cmd="imageget" in the field (3)
push cmd="imageget"
Press the send button (4) - or hit return.
A list of data should appear in the raw data field, with one new line every second, something like:
... <push done="true"></push>
-> push cmd="imageget"
<imageget x="0" y="0" w="0" h="0" format="BGR" remRad="false" dev="10" imgTod="1281613399.200692" posName="" pool="0"></imageget>
<imageget x="0" y="0" w="0" h="0" format="BGR" remRad="false" dev="10" imgTod="1281613400.182666" posName="" pool="0"></imageget>
<imageget x="0" y="0" w="0" h="0" format="BGR" remRad="false" dev="10" imgTod="1281613401.164516" posName="" pool="0"></imageget>
<imageget x="0" y="0" w="0" h="0" format="BGR" remRad="false" dev="10" imgTod="1281613402.146366" posName="" pool="0"></imageget>
<imageget x="0" y="0" w="0" h="0" format="BGR" ...
The camera image itself will not be shown (not implemented).
Figure 3: Camera server access for test of camera device.
Laser scanner
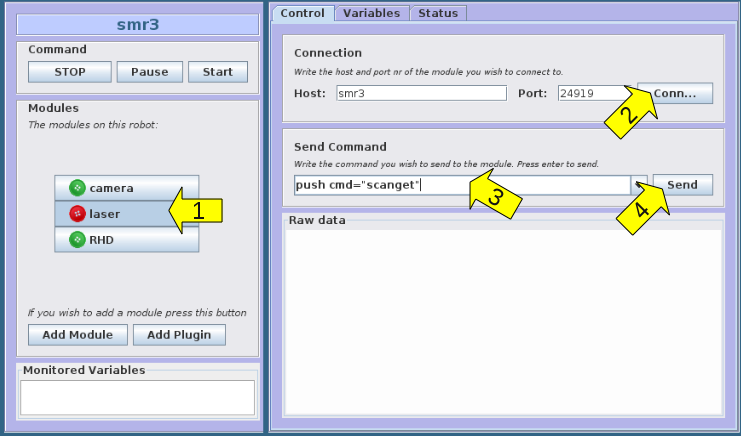
Select the laser module (1) and press the connect button (2) (as shown on image).
This should change the laser button to green. Then type push cmd="scanget" in the field (3)
push cmd="scanget"
Press the send button (4) - or hit return.
A list of data should appear in the raw data field, with one new block every second, something like:
...
-> push cmd="scanget"
<push done="true"></push>
<scanget serial="1" interval="0.351562" count="682" tod="1281613992.348607" unit="mm" min="-119.88" max="119.53" codec="HEX">
<pose name="robot" x="0.000" y="0.000" h="0.000"></pose>
<pos3d x="0.2" y="0" z="0.05" name="device"></pos3d>
<rot3d name="device" Omega="0" Phi="0" Kappa="0"></rot3d>
<bin size="2728" codec="HEX">0000000000000000000000000000000000000000000000000000000000000000000067015601560156015801560158015801570156015701570158015a015b015d01620169016c016e01000000000000000000000000000000000000000000000000000000000000000000000000000000000000000000007800780078000000000000000000000000000000000000000000000000000000000096029602960299029a029a029a029a029a029a029a029a029e02a002a202a302a802a802a802a902a902a902a902a902a802a702a702a802b102b302b302b602ba02bc02bb02bc02c302c402c702c702c702b002b002b002dd02e502e6029b09a409a409a409a409a609b309b309a609470345033203320330032b031e031b03190312030e0303030103fd02f502ef02ec02e102e002dd02d102c702c002b502ad02ab029a0294029402870276027502660264024f024e024602450244024202370232023202320232023202320235023602360238023802380238023f02740b8f0b910b980b980b980b0a0aae097f095c094a0925091209fa08ea08d308ba08ad08a408a408a40800000000000000000000078000000000000000000000bb0aa00a840a5f0a420a250afb09e909d109c109b009aa098f098e0973096409640958094f0933093309490849080780140814080000e107c9078d077b076a075c07560746072d072d072c0715070f070e070e070e07000000000000a403a403a203a403a503a503a203a503a803be039604b304ce04ce0400000000000000000000a301a301a301a801a801a8019c019c019a0196019901950194019401940193019101900190018f018e018d018d018b018901890185018401840184018301830182018301830184018401840184018401820182017e017e017c017c017c017c017b017b0179017601760176017701790179017a017901790173017601760176017a017a017a017701760175017501750175017501730171017101710171017101710171016e016e016d016d016d016d016d016d016d016d016d016a0169016a016d016d016d016d016901690169016c016c016c016801680168016801680168016901690168016601660166016601660165016601660167016601660165016401640165016401650165016401620164016401650165016501670165016801680167016701670167016901690166016901690166016901690169016901690169016a016a0169016a01690169016c016e0171017101740178017b077b077b076f076f076d076d076d076d076d076f076f076d076f076f07730700000000000000000000000000000000000000000000000000000000000000000000000000000000000000000000000000000000000000000000000000000000000000000000000000000000000000000000078000000000000000000000000000000000000000000000100010001000100010001000100010001000100010001000100010001000100010001000fa0ff50ff20fe80fe40fd50fd50fd30fc60fc60fbd0fbb0ffb04fb04fb04fd04fe04000503050e051d0530053805480552055f0579057f0581059405a805aa05b405b705c305c305cc05d305e005ef05f305f605ff050406170f170f170f170f130f130f130f130f130f130f0e0f0e0f0d0f0d0f0d0f0d0f0d0f0c0f0c0f100f150f150f160f160f180f1b0f1e0f220f220f220f220f220f280f2e0f00000000000007800000000000000000000000000000000000000000000000000000000000000000000000000000000000000000000000000000000000000000000000000000000000000780000000000000078000000000000000000000000000000000000000000000490049003c003900370036003500</bin>
</scanget>
<scanget serial="3" interval="0.351562" count="682" tod="1281613992.744879" unit="mm" min="-119.88" max="119.53" codec="HEX">
<pose name="robot" x="0.000" y="0.000" h="0.000"></pose>
<pos3d x="0.2" y="0" z="0.05" name="device"></pos3d>
<rot3d name="device" Omega="0" Phi="0" Kappa="0"></rot3d>
<bin size="2728" codec="HEX">000000000000000000000000000000000000000000000000000000000000000000005e015701540157015701540157015901590159015901580158015a015b015c0163016a016c016e0100000000000000000000000000000000000000000000000000000000000000000000000000000000000000000000740074007400000000000000000000000000000000000000000000000000000000008e028e028e028f02970297029c029c029c029c029c029c029c029c02a502a502a502a702a502a702aa02a702ac02ac02ab02aa02ab02ab02b002b102b202b302b602b702bb02bf02c202c202c402c402c202b602b602b602dc02e502e502a709a709a709a709ac09ac09b909b909b909410340033f0333032903260323031b0315030e030b030703fa02f602f302ec02e602e102df02d502cd02c802bb02bb02b802a4029d0292028c02850277026d0268025502530251025002420240023d0235023402330230023002300230023202340235023502350235023d023d02820b830b870b9b0b9b0b9b0b010aae0971095f093c0925091d09f808f108d008c408ae08a108a108a10800000000000000000000078000000000000000000000be0aa00a8d0a6c0a4a0a2a0afe09e709cc09cb09b709a609920991097e096c096c095a094a09340934095108510807800000000007800680c607940786076c075d074e07430730072d071e071c071607120712071607000000000000a803a803a803a803a803a803a603a603a803b7039a04af04d004d004000000000000000000009e019e019e01a101a101a1019b019b019a019901990197019701970193019201920192019201910190018e01890188018801880188018701890187018401840184018401840180018001820183018201820183017f017e017e017f017d017b017b01760176017601750175017a017501770178017801780178017801780176017401740170017001700173016e0173016e01720172017201700170016f016f016f016f016f016f016f016d016b016d016c016d016c016c016c016c016b016a016a016a01690168016801670167016701660166016601650169016901690165016501650168016401680168016901620165016401650165016501650165016501640164016401640164016401610161016901610169016901680165016801650164016301640164016501660169016601690166016901650169016a016c016b016b016b016b016b016c016c0171017101710170017301750173077307730770076c076c07680768076807650765076b076c076c076e076f0700000000000000000000000000000000000000000000000000000000000000000000000000000000000000000000000000000000000000000000000000000000000000000000000000000000000000000000078000000000000000000000000000000000000000000000100010001000100010001000100010001000100010001000100010001000100010001000fb0ffa0ff10ff00fea0fd10fd00fcb0fc70fc70fbc0fb80ffe04fe04fe04fe0401050205090512051e05290536054905580566056d0577057f0599059e05a605b305b405c005c405d005d605e005ec05ed05f205ff050906110f190f190f140f140f140f120f100f120f130f100f0f0f0f0f0f0f0f0f0f0f100f150f150f150f160f1a0f1a0f1d0f1f0f200f200f200f210f230f260f2b0f2c0f2d0f000000000000078000000000000000000000000000000000000000000000000000000000000000000000000000000000000000000000000000000000000000000000000000000000000007800000000000000780000000000000000000000000000000000000000000004b0044003b003700370037003700</bin>
</scanget>
Figure 4: Access to laser scanner server and data from the laser scanner.
How it works
The MARG support has tree elements
- The java applet shown in the browser
- An AURS server providing the data support
- An entry in the boot script file.
Java applet
The java applet is loaded as the default apache home-page on the robot. The files are located at:
/srv/httpd/htdocs/
    index.html
    robot.xml
    dist/
      marg2.jar
The index.html specifies where to start in the java file marg2.jar.
The robot.xml specifies how marg is configured with modules and other options.
The applet contacts a AURS server on port 24926. This server is the interface point to the Mobotware, and handles in addition the interface to RHD. This module is thus called RHD.
The laser and camera modules may contact laser scanner server and the camera server, once these are running.
The marg2.jar is actually a symbolic link pointing to /usr/local/smr/marg/marg2.jar (and the file is thus on kalman/opt/smr/marg/marg2.jar).
The robot.xml file is on the reboot copied from /usr/local/smr/marg/robot.xml and modified to the actual hostname (using a sed command in /etc/rc.d/rc.local)
The source code for the MARG applet is on the timmy.elektro.dtu.dk SVN, as the rest of the Mobotware, in a marg directory.
AURS server
The interface point for MARG is a AURS server called aukeeper, The configuration for this server is saved on the robot as follows:
/root/keeper/
   aukeeper.ini            configuration of aukeeper on port 24926
   ucamserver.ini          configuration of camera server when started by aukeeper
   ulmsserver.ini          configuration of laser server when started by aukeeper
   keepucamserver.rule     rule to start and stop camera server when needed
   keeplmsserver.rule      rule to start and stop laser server when needed
   connectrhd.rule         rule to start and stop connection to RHD
   startserver             bash script to (re)start laser or camera server
The aukeeper rules activates when it detects a client (MARG), and then connects to RHD and starts the camera and laser server. When the client (MARG) disconnects (browser window is closed), then the laser and camera server is closed and the connection to RDH is terminated. This configuration is the same for all robots.
The aukeeper itself is started in /etc/rc.d/rc.local on boot.
BOOT script
The MARG support is started on robot boot as a part of the /etc/rc.d/rc.local script, as follows:
/etc/rc.d/rc.local
  ...
  cd /root/keeper
  export LD_LIBRARY_PATH="/usr/local/smr/bin:/usr/local/smr/lib"
  /usr/local/smr/bin/aukeeper -a >/dev/null &
  # replace title and hostname in robot.xml file for MARG (default in file is smrhost)
  cp /usr/local/smr/marg/robot.xml /srv/httpd/htdocs/robot.xml
  SMRHN=`hostname`
  sed -i "s/smrhost/$SMRHN.iau.dtu.dk/g" /srv/httpd/htdocs/robot.xml
  ...
The plugins needed by the aukeeper is placed in /usr/local/smr/bin, so that is the reason for the LD_LIBRARY_PATH. Then the aukeeper is started as a separate (root) process. The MARG configuration file robot.xml is copied to a local file in the apache directory /srv/httpd/htdocs/robot.xml and modified with the actual hostname using the string edit command sed
robot.xml
The MARG configuration file may look like this
<?xml version="1.0" encoding="UTF-8"?>
<robot>
   <name>smrhost</name>
   <module>
       <name>camera</name>
       <host>smrhost</host>
       <port>24920</port>
       <autoConnect>true</autoConnect>
   </module>
   <module>
       <name>laser</name>
       <host>smrhost</host>
       <port>24919</port>
       <autoConnect>true</autoConnect>
   </module>
   <module>
       <name>RHD</name>
       <host>smrhost</host>
       <port>24926</port>
       <plugin>SMRPlugin</plugin>
       <autoConnect>true</autoConnect>
   </module>
   <controlButtons>
       <start moduleName="RHD" command="push cmd='var allcopy'"/>
       <pause moduleName="RHD" command="push flush"/>
       <stop moduleName="RHD" command="push flush"/>
   </controlButtons>
   <watch moduleName="RHD" watch="odopose.pose" okMin="-1000" okMax="1000"/>
</robot>
INI-files
The keeper is the application running at startup keepint the needed applications running as needed. (and restarting if they crash). The aukeeper.ini could look like this:
server imagepath="/root/keeper/log_keep"
server datapath="/root/keeper/log_keep"
module load='var'
server port=24926
#server serverlog
# interfaces
#
# load RHD interface
module load="/usr/local/smr/bin/aurhdif.so.0"
rhd hup
rhd host=localhost:24902
#rhd connect write=false
#
# cam
module load="if" alias=cam
var cam.runAliveTest=true
cam connect=localhost:24920
camonconnect cmd="cam push t=4 imageget"
camonconnect cmd="cam push t=3 cmd='var allcopy'"
#
#
module load="if" alias=laser
var laser.runAliveTest=true
laser connect=localhost:24919
laseronconnect cmd="laser push t=5 scanget"
laseronconnect cmd="laser push t=3 cmd='var allcopy'"
#
module load="/usr/local/smr/bin/aurule.so.0"
rule log=false
rule load="./keepucamserver.rule"
rule load="./keeplmsserver.rule"
rule load="./connectrhd.rule"
rule resume


