Robobot
This page is for ROBOBOT, an extension of REGBOT with a raspberry pi and three wheels.
Figure 1. Robobot (V4 - left and V5 right), - see drawing https://cad.onshape.com/documents/97c36fb21a7a858c57c0af9f/w/0d867586bc28d7a9194d7ff3/e/ca0f539fa3eee3cfe0ed4130 and https://cad.onshape.com/documents/97c36fb21a7a858c57c0af9f/w/0d867586bc28d7a9194d7ff3/e/432d56e456affc4edca37317. The camera should be able to see the floor about 105mm in front of the robot (V4 robot).
Overview
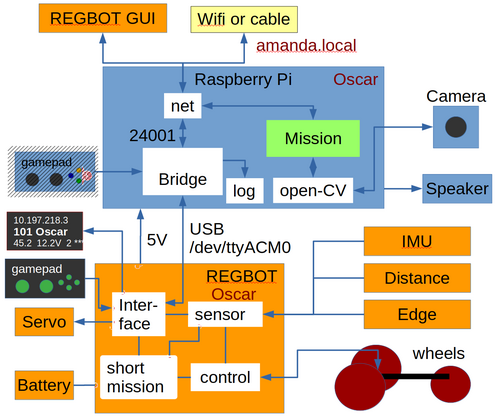
Figure 2. ROBOBOT is an extension of the simpler robot REGBOT. The REGBOT part controls the wheels, interfaces to sensors like an IMU (6 axis accelerometer and gyro), IR distance sensors (2), and a line edge detector. REGBOT further controls up to 3 servos and controls the battery supply. ROBOBOT is further equipped with a Raspberry Pi to allow more complicated missions. On the Raspberry Pi runs an interface process called robobot_bridge, this interfaces to a small 5-line display, to a game-pad and is the main interface to the REGBOT. The mission process collects data from the bridge and from ROBOBOT, and supplies the REGBOT with small mission snippets. The mission further holds the interface to the Raspberry Pi camera and may use the Open-CV library functions. The speaker allows debugging messages or other sound effects. By default battery voltage is announced at intervals.
The ROBOBOT functions are available on the net at port number 24001. The existing user interface for REGBOT can access REGBOT functions from this port.
The gamepad can take over control of the mission fails, and can be used to initiate missions or other functions using the buttons and axis on the gamepad.
More on the mission software here Full_installation_instructions#ROBOBOT_mission_demo_C.2B.2B.
Getting started
This section contains a quick-start guide for the user. It includes how to get the robot connected to Eduroam WiFi for easy access, an explanation of software and software structure and present a few examples to get the robots driving. Press the link below to go to the instructions page.
Instructions for getting started
Software description
Mission software
For the mission block, there is a template that illustrates how to make s mission and send it to the robot in snippets.
Bridge software
The bridge - called robobot_bridge - runs on the Raspberry Pi and is started when the Raspberry Pi starts.
Robobot_bridge overview
The autostart feature is implemented in '/etc/rc.local' with the following line
cd /home/local/robobot_bridge/build && ./robobot_bridge -a &
Mission software
The mission application is the primary user control for the robot.
Robobot mission application overview.
Mission is started manually from an ssh console.
Installation instructions
This section contains instructions for setting up a clean Raspberry Pi.
Robobot_bridge
Robobot_bridge is started from the startup script /etc/rc.local, and thus need a reboot to start the new version,
or start it manually (is also better for debugging, as it has some on-line help (type help after start):
sudo pkill robobot_bridge
cd ~/robobot_bridge/build
sudo ./robobot_bridge
After a REGBOT compile, the generated regbot.hex need to be loaded into the teensy, this can be done from the raspberry, if you have a screen and a keyboard (or a computer with an X-server), or from another computer, but requires that a USB cable to that computer and install the loader application (from https://www.pjrc.com/teensy/loader.html )
Setup issues
A number of parameters in the REGBOT part of the robot needs setting.
Some suggestions are provided here using the REGBOT GUI (available on the raspberry in the qtgui directory, see above):
Hardware
The Robobot frame is 3D printed, the design is in onshape - see this link https://cad.onshape.com/documents/97c36fb21a7a858c57c0af9f/w/0d867586bc28d7a9194d7ff3/e/ca0f539fa3eee3cfe0ed4130, in the list of parts to the left it is possible to export (right-click) as STL files, that you can slice for your 3D printer.
The REGBOT part of the hardware is described on the Regbot_version_4 page.
Connection of the line display to the Raspberry pi is here Robobot Hardware.
Status
Se status for robotter sammen med REGBOT status: REGBOT_robot_status#Robobot.


