Inspection robot
Installation and use noted for 6-legged inspection robot.
Mobotware on a Raspberry PI
Installation - see How-to guide on main page.
Mobotware on a Beaglebone Black
Installation - Ask Søren Hansen in 326/014.
When Mobotware has been installed, log on to the Beaglebone Black (BBB) using a terminal with the following command:
ssh root@<BBB-ip>
Then navigate to the appropriate plugin folder. The exact path may vary depending on the installation. Most common paths are:
rhd/plugins/4legged/
rhd/plugins/6legged/
rhd/trunk/plugins/4legged/
rhd/trunk/plugins/6legged/
Then, the RHD can be started which will initiate I2C communication with the servo motor. To read out/set variables, RHDtest can be started in another terminal window.
NOTE: The RHD plugin needs to be compiled before using it for the first time after installation of Mobotware. This is done by navigating to the appropriate folder above, and writing the command "Make".
Servomotor
Hardware
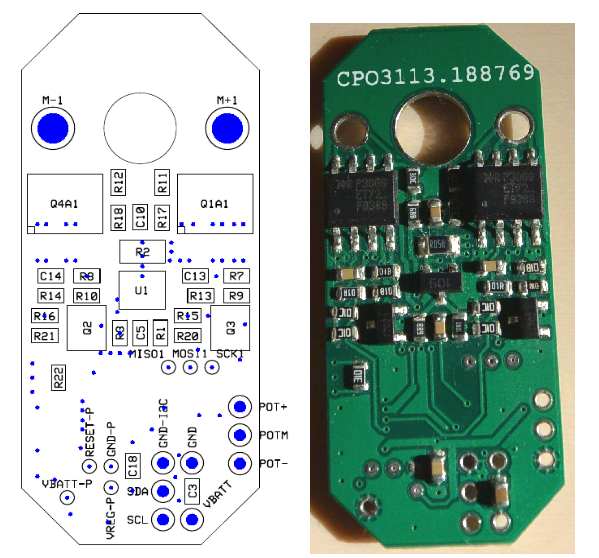
The Hitec HS646-WP electric servo motor are used for the inspection robot. See Hitec's website for specifications[1]. The servo does not provide feedback by default, and is therefore augmented with the OpenServo project's PCB and software/firmware. The PCB and firmware are modified to fit the purpose of the inspection robot.
- Potentiometer mount:
Green towards motor yellow center Red away from motor.
- or maybe more likely, motor is turned 180 deg.
- Power:
At least 6.5V - to allow regulator to give 5V
- Layout of servo-print with connections. Looks like Vbatt-P is connected to pot-, this can not be right?
Firmware
As of August 2015, the servomotor firmware for the modified OpenServo PCB supports the following:
- Sampling of Back-EMF (only up to duty-cycle of 76%, due to discharge time of armature coil).
- Sampling of voltage, position and armature current.
- PID control (The integration is untested).
- 500 Hz PWM control.
- Up to 400 kHz I2C bus frequency (Max supported by the ATmega168 MCU).
Operational Notes
- A P-gain is needed to make the servo run. A value of about 50 is a good starting point.
- A D-gain does not affect the precision/overshooting. See the "Controller Characteristics" section for test results.
- Internal sampling of Back-EMF, voltage, position and current is at 500 Hz (once per PWM cycle).
- Need to investigate control-part of servo.
- Maximum obtainable external sampling rate with 400 kHz I2C bus frequency was approx 1249 Hz with a single servomotor and approx 312 Hz with four servomotors (a single robot leg). However, these frequencies cannot be obtained continuously.
Controller Characteristics
Tests have been conducted with regards to determining the precision of the servomotor depending on the PD-controller gains. The table below shows the results. Position θ, and error e, are in A/D units.
| e = 600 | |||
|---|---|---|---|
| P = 100 | |||
| D = 0 | D = 50 | D = 100 | D = 150 |
| θ ± 12 | θ ± 15 | θ ± 15 | θ ± 15 |
Old RHD Plugin
The initial version of the RHD plugin was connected to a servomotor using the USBISS converter (USB-to-I2C), and is not longer used.
Setting and main status for N servos (up to 24) implemented. Debug status for 1 servo implemented (first 48 registers are monitored)
Commands (write with register adress above 0x7f) is working
0x82 (130) enable PWM
0x83 (131) disable PWM
etc - see main.c in software
Change of I2C address is not implemented in this version (There is a save to EEPROM command).
