Web status page
Back to Flexbot main page
Introduction
Installation and configuration of web status page.
Installation
Overview
The robot configuration includes a web server that allow "any" browser to connect to the robot and get status and rudimentary control of the robot.
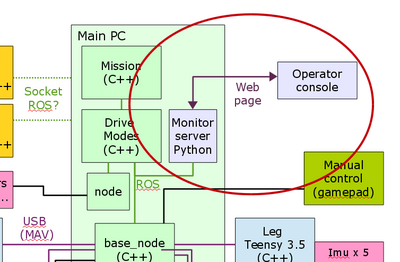
Figure 1. The robot status web page interacting with the robot through a Python to ROS connection. The operator console is then just an ordinary web page (with some dynamic content based on Java script).
Packages needed
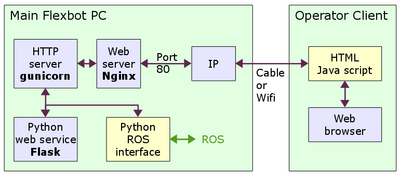
The web interface depends on a number of packages, as shown in figure 2.
Figure 2. The client access the service by connecting a browser to the IP of the robot. The web server Nginx directs the connection to a fresh web socket for each client (port 8000, 8001, ..) serviced by the GUnicorn HTTP server. This HTTP server uses Flask as a service to render the web pages and allow a Python script to provide dynamic content. The dynamic content is obtained from the ROS communication.
Packages
install (if not already installed):
sudo apt install nginx
sudo apt install python-flask
sudo apt install gunicorn
sudo apt install python-pip
sudo apt install libjs-websocket
pip install Flask flask-socketio gunicorn
pip install eventlet gevent
pip install flask-cors
Optionally html editor
sudo install bluefish
Configure server and service
Nginx
Nginx accepts clients on port 80 (normal web port) and directs traffic to port 8000, where the main communication between web client and server takes place.
Create a file in /etc/nginx/sites-available with site information:
cd /etc/nginx/sites-available
sudo nano flask_settings
Insert the following into the file (the file is also found in git flexbot/code/www/nginx_conf/flask_settings):
upstream socketio_nodes {
   ip_hash;
   server 127.0.0.1:8000;
   server 127.0.0.1:8001;
   server 127.0.0.1:8002;
   # to scale the app, just add more nodes here!
}
server {
   listen 80;
   server_name localhost;
   location / {
       include proxy_params;
       proxy_pass http://127.0.0.1:8000;
   }
   location /socket.io {
       include proxy_params;
       proxy_http_version 1.1;
       proxy_buffering off;
       proxy_set_header Upgrade $http_upgrade;
       proxy_set_header Connection "Upgrade";
       proxy_pass http://socketio_nodes/socket.io;
   }
}
The site needs to be enabled too, and this is done by making a link in /etc/nginx/sites_enabled, removing the old, by
cd /etc/nginx/sites-enabled
sudo rm default
sudo ln -s /etc/nginx/sites-available/flask_settings /etc/nginx/sites-enabled/flask_settings
NGINX needs to be restarted to implement:
sudo service nginx restart
/var/www
The server uses files in /var/www as default. Make a link to the application files, or copy them to /var/www to get the following file structure:
/var/www/flaskapp/
                /templates/
                          /includes/
                                   /_intgraph1.html
                                   /_navbar.html
                                   /_sidebar.html
                          /home.html
                          /layout.html
                          /test.html
                /static   /
                          /css    /
                                  /mainstyle.css
                          /scripts/
                                  /chat1.js
                                  /chart2.js
                /myapp.py
cd /var/www
sudo ln -s ~/flexbot/code/www/flaskapp .
gunicorn
To start the python application - server side - application, start the following:
Go to directory with myapp.py
cd /var/www/flaskapp
For debug
sudo gunicorn --worker-class eventlet -w 1 myapp:app
- a known error in gunicorn gives this: "AttributeError: 'Response' object has no attribute 'status_code'" that can be ignored.
When all is OK, add this to /etc/rc.local: '-p' is for making a pid file '-D' is for creating a Daemon (Gunicorn runs in the background)
sudo gunicorn --worker-class eventlet -w 1 -p pidfile -D myapp:app
Now you should be ready to connect a browser to localhost.
External WEB resources
If web server is to operate without connection to internet, then some shared resources needs to be installed locally.
Style sheets
Install the javascript bootstrap CSS
sudo apt install libjs-bootstrap
This will install to /usr/share/javascript/bootstrap.
Make link in /var/www/flaskapp to the newly installed stylesheet/javascript files (added -4.1.3 to allow version change easily)
cd /var/www/flaskapp/static
ln -s /usr/share/javascript/bootstrap bootstrap-4.1.3
ln -s bootstrap-4.1.3 bootstrap
ln -s /usr/share/javascript
Local version of bootstap style sheets
see https://getbootstrap.com
Flask
For further Flask and SocketIo see

