|
|
| (32 intermediate revisions by the same user not shown) |
| Line 1: |
Line 1: |
|
| |
|
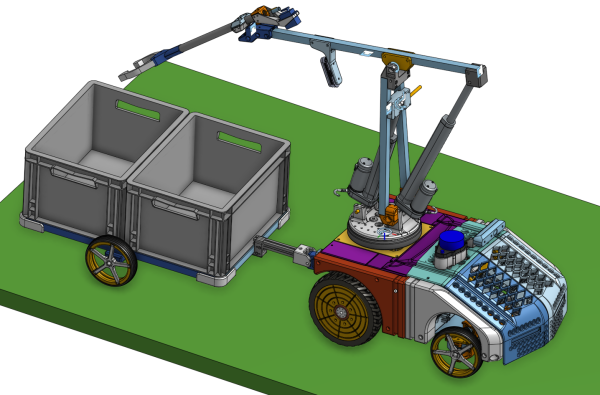
| [[File:scorpi_in_profile.png | 600px]] | | Scorpi has its name as it looks a bit like a scorpion and is controlled by Raspberry Pi. |
| | |
| | [[File:scorpi_in_profile.png | 600px | On-shape view of the Scorpi design. | On-shape view of the Scorpi design.]] |
|
| |
|
| ==Overview== | | ==Overview== |
|
| |
|
| ==Development nodes==
| | [[Scorpi modules | Scorpi hardware interface modules]] |
|
| |
|
| === Raspberry pi ===
| | [[Motor drive]] firmware. |
|
| |
|
| Raspberry pi 5 installation
| | [[Motor drive PCB]] and cabling. |
|
| |
|
| * enable serial IO hardware (GPIO pin 14,15) - but it doesn't seem to work on pi-5, can't read or write.
| |
|
| |
|
| Install packages:
| | ==Development nodes== |
| libreadline-dev
| |
| libopencv-dev
| |
| libgpiod-dev
| |
| gpiod
| |
| cmake
| |
| subversion
| |
| aptitude
| |
| ntp
| |
| ntpdate
| |
| nmap
| |
| lsof
| |
| swig
| |
| sudo apt install libreadline-dev libopencv-dev libgpiod-dev gpiod cmake subversion aptitude nmap lsof swig
| |
| | |
| === YDLidar (S4B) === | |
| | |
| YDlidar serial connected like this:
| |
| | |
| YDLIDAR cable color Raspberry
| |
| 1 Vcc (5V) black 4 (5V)
| |
| 2 Tx red 10 (GPIO 15) (RxD)
| |
| 3 Rx white 8 (GPIO 14)(TxD)
| |
| 4 Gnd Yellow 6 (Ground)
| |
| 5 M_SCP Orange 18 (GPIO 24)
| |
| 6 Dev_enable Green 16 (GPIO 23)
| |
| 7 M_enable Blue 12 (GPIO 18)
| |
| 8 NC Purple 14 (ground, to use all pins)
| |
| | |
| Software YDLidar-SDK
| |
| | |
| From Git repository
| |
| | |
| $ mkdir -p git
| |
| $ cd git
| |
| $ git clone https://github.com/YDLIDAR/YDLidar-SDK.git
| |
| $ cd YDLidar-SDK
| |
| $ mkdir build
| |
| $ cd build
| |
| $ cmake ..
| |
| $ make -j4
| |
| | |
| ==Ros2 Iron==
| |
| | |
| Installation on Raspberry Pi 5 running
| |
| default 64-bit OS: Debian GNU/Linux 12 (bookworm)
| |
| | |
| === Base===
| |
| Add en_DK.UTF-8 in this list
| |
| $ sudo dpkg-reconfigure locales
| |
| Then run
| |
| $ sudo update-locale LC_ALL=en_DK.UTF-8 LANG=en_DK.UTF-8
| |
| $ export LANG=en_DK.UTF-8
| |
| | |
| Install the compiled version of ROS2.
| |
| I couldn't get the pre-build version to work.
| |
| Follow the instructions from here:
| |
| | |
| https://docs.ros.org/en/iron/Installation/Alternatives/Ubuntu-Development-Setup.html
| |
| | |
| Note: I got:
| |
| E: Malformed entry 1 in list file /etc/apt/sources.list.d/ros2.list (Component)
| |
| E: The list of sources could not be read.
| |
| Then I modified /etc/apt/sources.list.d/ros2.list
| |
| sudo nano /etc/apt/sources.list.d/ros2.list
| |
| by adding "bookworm" near the end of the line
| |
| deb [arch=arm64 signed-by=/usr/share/keyrings/ros-archive-keyring.gpg] http://packages.ros.org/ros2/ubuntu bookworm main
| |
| The bookworm came from:
| |
| $ lsb_release -sc
| |
| | |
| === Ros2 domain ===
| |
| | |
| Ros2 domain over local network
| |
| | |
| $export | grep ROS_
| |
|
| |
|
| could show
| | [[Scorpi Pi installation| Raspberry Pi 5 installation]] for Scorpi. |
|
| |
|
| declare -x ROS_AUTOMATIC_DISCOVERY_RANGE="SUBNET"
| | [[MQTT and Mosquitto]]. |
| declare -x ROS_DISTRO="humble"
| |
| declare -x ROS_DOMAIN_ID="8"
| |
| declare -x ROS_LOCALHOST_ONLY="0"
| |
| declare -x ROS_PYTHON_VERSION="3"
| |
| declare -x ROS_VERSION="2"
| |
|
| |
|
| In this case, ROS cooperates with others on the local network who also have ROS_DOMAIN_ID="8."
| | [[Teensy interface]] installation. |
|
| |
|
| If used e.g. put "export ROS_DOMAIN_ID=8" into ~/.bashrc
| | [[YD-Lidar details]]. |
|
| |
|
| ROS_DOMAIN=0 is the default.
| | [[Scorpi Ros Iron]] (outdated). |
