|
|
| (223 intermediate revisions by 2 users not shown) |
| Line 1: |
Line 1: |
| Small robot intended for control-1 exercises.
| |
|
| |
|
| It consist of an 72MHz 32 ARM processor on a teensy 3.1 board, controlling an pololu motor controller and 2 small pololu motors with magnetic encoder. a further sensor is sparkfun 9050 IMU. Supplied by 12V 2A from 220V on a thin wire.
| | REGBOT is a small robot designed for exercises for our linear control 1 course (PID control) ([http://www.dtu.dk/english/Service/Phonebook/Person?id=14453 author]). |
|
| |
|
| ==Software installation==
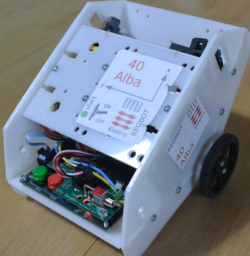
| | [[file:foto_of_Alba_40.png | 250px]] |
|
| |
|
| ===Toolchain installation===
| | Figur 1. Version 2 of Regbot. |
|
| |
|
| Install arduino 1.05 from
| | == Overview == |
| http://arduino.cc/en/Main/OldSoftwareReleases
| |
| (newer arduino versions is not supported - as of September 2014)
| |
|
| |
|
| Then get and install the teensey tool installer from:
| | This section is intended for users. |
| https://www.pjrc.com/teensy/td_download.html
| |
|
| |
|
| Run the installer - on 32 bit linux it is:
| | [[Getting started]] with REGBOT GUI. |
| chmod +x teensyduino.32bit
| |
| ./teensyduino.32bit
| |
|
| |
|
| It installes (only) as a merge with the arduino installed directory (arduino-1.0.5).
| | [[User interface]], how to configure the robot using the Regbot client. |
|
| |
|
| From this installation we need only some hardware part in
| | [[Control]] overview gives some information on control possibilities. |
|
| |
|
| arduino-1.0.5/hardware/tools
| | [[Mission]], how to write a mission. |
| arduino-1.0.5/hardware/teensy/cores/teensy3
| |
|
| |
|
| ===Teensy loader and udev rules===
| | [[Regbot calibration]] for better performance. |
|
| |
|
| Teensy loader:
| | [[Regbot maintenance]] for longer life. |
| Get the loader - and udev rules - from
| |
| https://www.pjrc.com/teensy/loader.html
| |
|
| |
|
| The teensy loader needs to be unpacked - on linux it is:
| | [[Regbot GUI]] installation. |
| gunzip teensy.gz
| |
| chmod +x teensy
| |
|
| |
|
| For Linux get also the udev rules, and copy them to /etc/udev/rules.d to get read-write access to the usb connection (/dev/ttyACM0) and others:
| | [[Regbot hardware board]]. |
|
| |
|
| sudo cp 49-teensy.rules /etc/udev/rules.d/
| | == Install notes == |
|
| |
|
| ===Regbot software===
| | This section is primarily installation notes and more detailed descriptions not usually needed by the end-user. |
|
| |
| Then get the regbot software (by mail from jca@elektro.dtu.dk)
| |
|
| |
|
| It consist of a series of directories but is missing the tools directory,
| | [[Regbot command interface]] - command list. |
| copy (or link) the arduino-1.0.5/hardware/tools directory to the regbot directory,
| |
| or set the TOOLPATH in the makefile.
| |
|
| |
|
| In the Makefile ensure that the first part is set reasonable, i.e. something like :
| | [[Software installation]] on REGBOT (Arduino) and tool-chain - Linux |
|
| |
|
| # The name of your project (used to name the compiled .hex file)
| | [[Regbot old stuff]] |
| TARGET = regbot
| |
| # The teensy version to use, 30 or 31
| |
| TEENSY = 31
| |
| TEENSY_CORE_SPEED = 72000000
| |
| OPTIONS = -DUSB_SERIAL -DLAYOUT_US_ENGLISH
| |
| # directory to build in
| |
| BUILDDIR = $(CURDIR)/build
| |
| #************************************************************************
| |
| # Location of Teensyduino utilities, Toolchain, and Arduino Libraries.
| |
| # To use this makefile without Arduino, copy the resources from these
| |
| # locations and edit the pathnames. The rest of Arduino is not needed.
| |
| #***********************************************************************
| |
| # path location for Teensy Loader, teensy_post_compile and teensy_reboot
| |
| BASEPATH = .
| |
| TOOLSPATH = $(BASEPATH)/tools
| |
| # path location for Teensy 3 core
| |
| COREPATH = $(BASEPATH)/teensy3
| |
| # path location for Arduino libraries (not needed)
| |
| LIBRARYPATH = libraries
| |
| # path location for the arm-none-eabi compiler
| |
| COMPILERPATH = $(TOOLSPATH)/arm-none-eabi/bin
| |
| #************************************************************************
| |
| # Settings below this point usually do not need to be edited
| |
| # - mostly that all source-code (*.c and *.cpp) needs to be compiled and linked
| |
| #************************************************************************
| |
| ...
| |
