Basebot modules
Back to Basebot
Module description
Main code
The main code is in basebot_6.ino (sometimes renamed to basebot_6.cpp).
The code is based on the Arduino environment. Here the normal C-main function is hidden. But setup() is called first, followed by an endless loop that calles loop().
Setup
The setup() function is like this and initializes all support modules:
void setup()   // INITIALIZATION
{ // to be able to print to USB interface
  Serial.begin(12000000);
  // initialize sensors, safety and display
  robot.setup(); // alive LED, display and battery
  motor.setup(); // motor voltage
  encoder.setup(); // motor encoders to velocity
  imu2.setup(); // gyro and accelerometer - include tilt angle
}
Loop
The loop() function:
void loop ( void )
{ // init sample time
 uint32_t nextSample = 0;
 while ( true )
 { // main loop
   // get time since start in microseconds
   uint32_t us = micros();
   // loop until time for next sample
   if (us > nextSample) // start of new control cycle
   { // advance time for next sample
     nextSample += sampleTimeUs;
     // read sensors
     imu2.tick();
     encoder.tick();
     // advance test sequence (default is wait for start button)
     testSequence();
     // make control actions
     controlUpdate();
     // give value to actuators
     motor.tick();
     // support functions
     robot.tick(); // measure battery voltage etc.
     display.tick(); // update O-LED display
   }
   usb.tick(); // listen to incoming from USB
 }
}
The loop (while (true)) runs as fast as it can, and if it is not time for a new sample, then the USB connection is serviced (usb.tick()).
When the sample time has passed, the next sample time is set up. Both use the standard Arduino call micros(), which returns the number of microseconds since boot.
At every sample, the sensors are handled first (imu.tick() and encoder.tick()); these will get new data from the sensor, and the encoder will estimate the motor velocity.
Next is testSequenct(), which is intended as a state machine that changes what the robot should do, as described below. The default is to wait for the start button to be pressed.
All data for the control effort is now available (controlUpdate()). The default controller uses the desired velocity as motor voltage, ignoring the estimated velocity. This is a feed-forward-only controller.
The control effort sets the motor voltages and the motor.tick() implements this as a PWM to the motor driver.
At the end, other service functions are called (robot.tick() and display.tick()) that (mostly) checks the battery voltage and updates the display.
Support modules
Motor
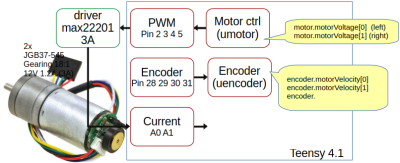
The motor action is implemented in src/umotor.cpp in function motorSetAnchorVoltage().
Motor voltage is translated to a PWM at 65kHz, where the average value corresponds to the set motor voltage. Current battery voltage is taken into consideration.
PWM = motorVoltage * MAX_PWM/(battery_voltage - voltageLoss)
The motor controller has a minimum pulse width. A minimum PWM is added to compensate if the motor voltage is not zero. The minimum corresponds to 0.4V motor voltage.
The motor current uses a HAL sensor ACS714; the zero is about 3.3V/2. Other nearby components may influence the values and should be used with caution.
The encoder uses an interrupt for every value edge. The velocity is estimated based on the timing difference from the last edge before this sample period to the newest edge.
Encoder values are available as
encoder.encoder[0..1]  A, unsigned 32-bit, counter of all edges detected. Positive is counterclockwise.
encoder.motorVelocity[0..1] Motor velocity (float) in radians per second before the gearbox. Positive is counterclockwise.
encoder.gear is the gearbox ratio (9.68)
encoder.pulsPerRev is the number of edges on a motor revolution (48)
If no edge is detected in this sample period, the time since the last edge is used, but only if this time gives a slower estimate.
The encoder estimates are implemented in src/uencoder.cpp.
Gyro and accelerometer
The sensor chip is an MPU9250. Sensor values are extracted from the chip at every sample time, but the values may be repeated if the sample time is faster than 1 ms.
The values are available as
imu2.gyro[0..2] for rotation velocity around axis x,y,z in degrees per second.
imu2.acc[0..2]  for acceleration along x,y,z. X is forward, Y is left, and Z is up.
The values are not compensated for the mounted position. Open the robot to see the device mounting.
(implemented in uimu2.cpp)
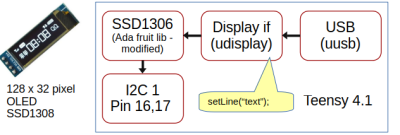
Display
The small O-LED display has one line (at the top) that the user can set.
It is implemented in src/udisplay.cpp.
Power and start button
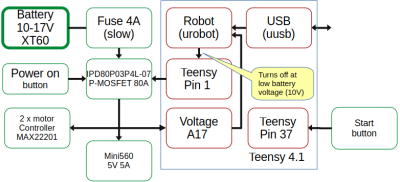
Power is managed in an attempt to avoid destroying the LiPo batteries.
The power is turned off when the battery voltage drops below 10 Volts (assuming a three-cell Lipo battery).
To turn the power back on, press the power button. The power will stay on regardless of the battery voltage as long as the button is pressed.
The P-MOS acts as the power switch and supplies battery voltage to the motor controllers and the 5V buck converter. The voltage is measured using pin A17.
When the USB is connected and the power is off, the USB 5V will power the robot. Even the motors can run (slowly) on USB power.
The start button is available on pin 37. Value is high when the button is pressed.


