Robobot architecture: Difference between revisions
| (47 intermediate revisions by the same user not shown) | |||
| Line 1: | Line 1: | ||
Back to [[Robobot B]] | Back to [[Robobot B]] | ||
== | == Software block overview == | ||
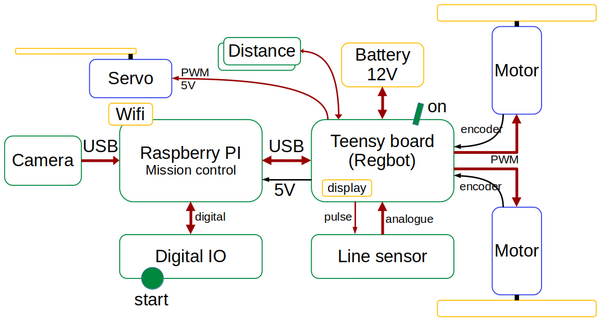
[[File:robobot-in-blocks-2024.png | 600px]] | |||
Figure 1. The main building blocks. | |||
=== Software building blocks === | |||
[[File:robobot-function-blocks.png | 600px]] | |||
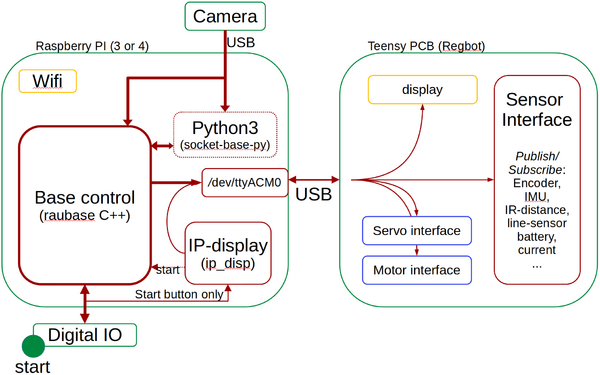
Figure 2. The main software building blocks. | |||
==== Base control==== | |||
The 'base control' block is the 'brain' of the robot. | |||
The base control is an expandable skeleton software that is intended as the mission controller. | |||
The skeleton includes basic functionality to interface the Teensy board, to interface the digital IO, and to communicate with a Python app. | |||
The base control skeleton is written in C++. | |||
==== Python3 block==== | |||
Vision functions are often implemented using the Python libraries. | |||
The provided skeleton Python app includes communication with the Base control. The interface is a simple socket connection, and the communication protocol is lines of text both ways. The lines from the base control could be e.g. "aruco" or "golf" to trigger some detection of ArUco codes or golf balls. | |||
The reply back to the Base control could be "golfpos 3 1 0.34 0.05" for; found 3 balls, ball 1 is at position x=0.34m (forward), y=0.05m (left). | |||
The Python3 block is optional, as the same libraries often are available in C++, and therefore could be implemented in the 'Base control' directly. | |||
==== IP-disp ==== | |||
Is a silent app that is started at reboot and has two tasks: | |||
* Detect the IP net address of the Raspberry and send it to the small display on the Teensy board. | |||
* Detect if the "start" button is pressed, and if so, start the 'Base control' app. | |||
==== Teensy PCB ==== | |||
The Teensy board is actually a baseboard used in the simpler 'Regbot' robot. | |||
This board has most of the hardware interfaces and offers all sensor data to be streamed in a publish-subscribe protocol. | |||
All communication is based on clear text lines. | |||
See details in [[Robobot circuits]]. | |||
==Software architecture== | |||
The software architecture is based on the old NASREM architecture, and this is the structure for the description on this page. | The software architecture is based on the old NASREM architecture, and this is the structure for the description on this page. | ||
The National Aeronautics and Space Administration (NASA) and the US National Institute of Standards and Technology (NIST) have developed a Standard Reference Model Telerobot Control System Architecture called NASREM. Albus, J. S. (1992), A reference model architecture for intelligent systems design. | (The National Aeronautics and Space Administration (NASA) and the US National Institute of Standards and Technology (NIST) have developed a Standard Reference Model Telerobot Control System Architecture called NASREM. Albus, J. S. (1992), A reference model architecture for intelligent systems design.) | ||
[[File:nasrem.png | 700px]] | [[File:nasrem.png | 700px]] | ||
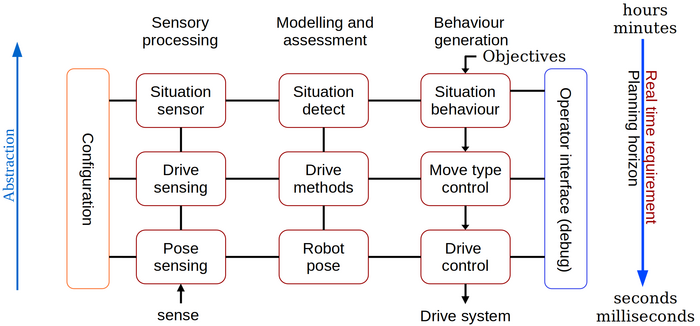
Figure | Figure 3. The NASREM model divides the control software into a two-dimensional structure. The columns are software functions: Sensor data processing, modelling, and behaviour control. | ||
The rows describe abstraction levels: | |||
* Level 1 with the primary control of the wheels for forward velocity and turn rate. This level also maintains the robot pose (position, orientation, and velocity, based on wheel odometry. | |||
* Level 2 is drive select, where the drive can be controlled by just odometry (forward velocity and turn rate) or follow a line based on the line sensor. This level also includes other sensor detections like crossing lines and distances. | |||
* Level 3 is where the overall behaviour is decided and includes camera sensor object detections like navigation codes and other objects. | |||
== Level 1 == | === Level 1; Pose and drive control === | ||
[[File:robobot_level_1.png | 800px]] | [[File:robobot_level_1.png | 800px]] | ||
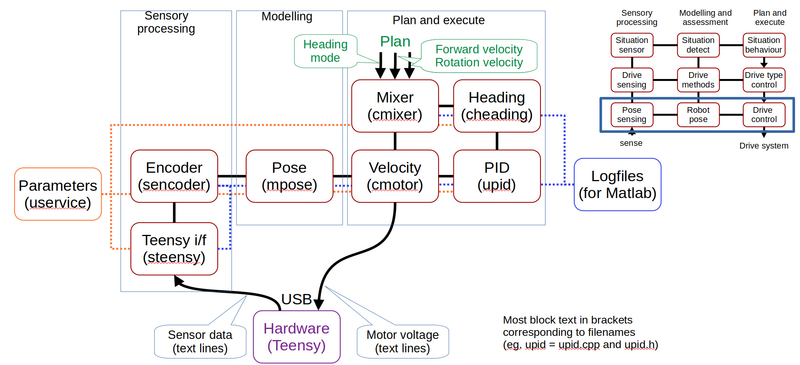
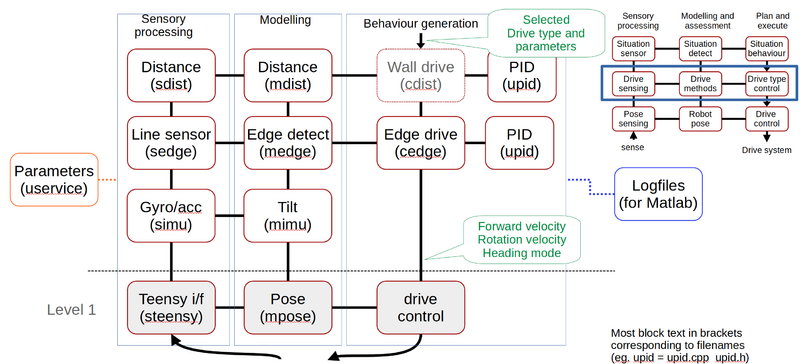
Figure | Figure 4. The lowest level in the control software. The encoder ticks are received from the hardware (from the Teensy board) into the sensor interface. The encoder values are then modeled into an odometry pose. The pose is used to control the wheel velocity using a PID controller. | ||
The desired wheel velocity for each wheel is generated in the mixer from a desired linear and rotational velocity. | The desired wheel velocity for each wheel is generated in the mixer from a desired linear and rotational velocity. | ||
The heading control translates rotation velocity to the desired heading and uses a PID controller to implement. | |||
More [[Robobot level 1]] details of the individual blocks. | |||
=== Level 2; drive select === | |||
[[File:robobot_level_2.png | 800px]] | |||
Figure 5. At level 2 further sensor data is received, modeled, and used as optional control sources. | |||
More [[robobot level 2]] details of the individual blocks. | |||
=== Level 3; behaviour === | |||
[[File:robobot_level_3.png | 800px]] | |||
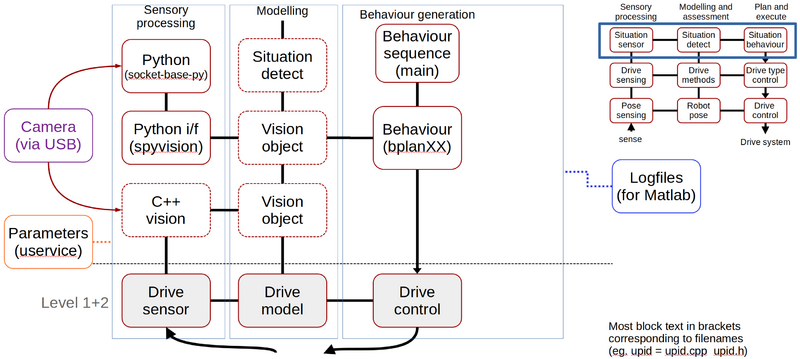
Figure 6. At level 3, the drive types are used to implement more abstract behaviour, e.g. follow the tape line to the axe challenge, detect the situation where the axe is out of the way, and then continue the mission. | |||
[[Robobot level 3 details]] | |||
Latest revision as of 11:24, 1 January 2024
Back to Robobot B
Software block overview
Figure 1. The main building blocks.
Software building blocks
Figure 2. The main software building blocks.
Base control
The 'base control' block is the 'brain' of the robot.
The base control is an expandable skeleton software that is intended as the mission controller. The skeleton includes basic functionality to interface the Teensy board, to interface the digital IO, and to communicate with a Python app.
The base control skeleton is written in C++.
Python3 block
Vision functions are often implemented using the Python libraries.
The provided skeleton Python app includes communication with the Base control. The interface is a simple socket connection, and the communication protocol is lines of text both ways. The lines from the base control could be e.g. "aruco" or "golf" to trigger some detection of ArUco codes or golf balls. The reply back to the Base control could be "golfpos 3 1 0.34 0.05" for; found 3 balls, ball 1 is at position x=0.34m (forward), y=0.05m (left).
The Python3 block is optional, as the same libraries often are available in C++, and therefore could be implemented in the 'Base control' directly.
IP-disp
Is a silent app that is started at reboot and has two tasks:
- Detect the IP net address of the Raspberry and send it to the small display on the Teensy board.
- Detect if the "start" button is pressed, and if so, start the 'Base control' app.
Teensy PCB
The Teensy board is actually a baseboard used in the simpler 'Regbot' robot. This board has most of the hardware interfaces and offers all sensor data to be streamed in a publish-subscribe protocol. All communication is based on clear text lines.
See details in Robobot circuits.
Software architecture
The software architecture is based on the old NASREM architecture, and this is the structure for the description on this page.
(The National Aeronautics and Space Administration (NASA) and the US National Institute of Standards and Technology (NIST) have developed a Standard Reference Model Telerobot Control System Architecture called NASREM. Albus, J. S. (1992), A reference model architecture for intelligent systems design.)
Figure 3. The NASREM model divides the control software into a two-dimensional structure. The columns are software functions: Sensor data processing, modelling, and behaviour control.
The rows describe abstraction levels:
- Level 1 with the primary control of the wheels for forward velocity and turn rate. This level also maintains the robot pose (position, orientation, and velocity, based on wheel odometry.
- Level 2 is drive select, where the drive can be controlled by just odometry (forward velocity and turn rate) or follow a line based on the line sensor. This level also includes other sensor detections like crossing lines and distances.
- Level 3 is where the overall behaviour is decided and includes camera sensor object detections like navigation codes and other objects.
Level 1; Pose and drive control
Figure 4. The lowest level in the control software. The encoder ticks are received from the hardware (from the Teensy board) into the sensor interface. The encoder values are then modeled into an odometry pose. The pose is used to control the wheel velocity using a PID controller. The desired wheel velocity for each wheel is generated in the mixer from a desired linear and rotational velocity. The heading control translates rotation velocity to the desired heading and uses a PID controller to implement.
More Robobot level 1 details of the individual blocks.
Level 2; drive select
Figure 5. At level 2 further sensor data is received, modeled, and used as optional control sources.
More robobot level 2 details of the individual blocks.
Level 3; behaviour
Figure 6. At level 3, the drive types are used to implement more abstract behaviour, e.g. follow the tape line to the axe challenge, detect the situation where the axe is out of the way, and then continue the mission.
